「本当に書いちゃいますか?」
「有料でもいい部分ですよ?いいんですね?」
そんなやりとりをするか、しないうちにこっそりと公開しちゃいます。
全部無料で公開!
Wordpressをカスタマイズして会員制サイトやライターさんごとにマイページを作る方法。
目次
the_author_metaでユーザー情報を増やす方法・変更する方法
まずはユーザー情報を表示したいページ(themes テーマ)に以下を入れてみましょう。
[php]
ユーザーの権限 <?php the_author_meta(‘user_level’); ?>
ログインID <?php the_author_meta(‘user_login’); ?>
ログインパス <?php the_author_meta(‘user_pass’); ?>
ニックネーム <?php the_author_meta(‘user_nicename’); ?>
メールアドレス <?php the_author_meta(‘user_email’); ?>
ウェブサイト <?php the_author_meta(‘user_url’); ?>
登録日 <?php the_author_meta(‘user_registered’); ?>
表示名 <?php the_author_meta(‘display_name’); ?>
ニックネーム <?php the_author_meta(‘nickname’); ?>
名 <?php the_author_meta(‘first_name’); ?>
姓 <?php the_author_meta(‘last_name’); ?>
プロフィールコメント <?php the_author_meta(‘description’); ?>
ユーザーID <?php the_author_meta(‘ID’); ?><br>
[/php]
もうこれを入れるだけで、それっぽくなります。
会員登録した方のみ表示させる場合は
[php]
<?php if( is_user_logged_in() ) : ?>
<p>ログイン中のユーザーに表示する記述をここに書く</p>
<?php else : ?>
<p>ログインしていないユーザー向けに表示する記述をここに書く</p>
<?php endif; ?>
[/php]
TwitterやFacebook、SkypeのIDをユーザーごとに追加
さらにfunction.php へこれを追加すると
[php]
/*——————————————-*/
/* プロフィールを追加と削除
/*——————————————-*/
function custom_profile_fields( $contactmethods ) {
unset($contactmethods[‘aim’]); // AIM
unset($contactmethods[‘yim’]); // Yahoo IM
unset($contactmethods[‘jabber’]); // Jabber
$contactmethods[‘skype’] = ‘Skype’;
$contactmethods[‘twitter’] = ‘Twitter’;
$contactmethods[‘facebook’] = ‘Facebook’;
$contactmethods[‘google_plus’] = ‘Google+’;
return $contactmethods;
}
add_filter(‘user_contactmethods’,’custom_profile_fields’,10,1);
[/php]
AIM、YIM、Jabbrを削除して
Skype、Twitter、Facebook、Google+を追加します。
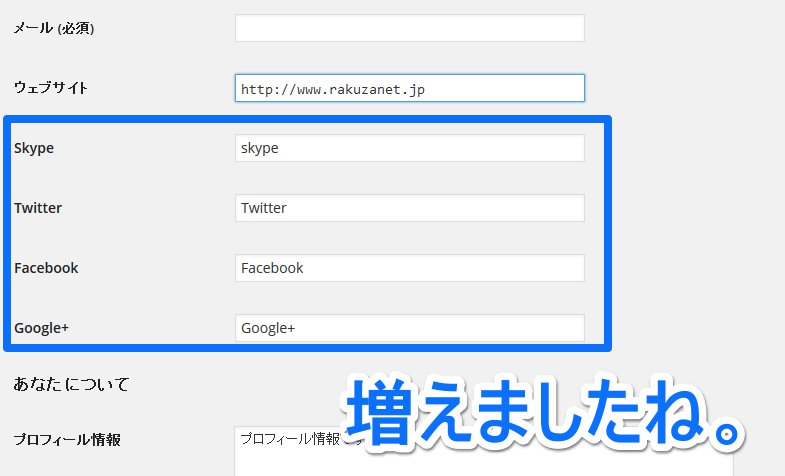
この様にAIM、YIM、Jabberが削除され
Skype、Twitter、Facebook、Google+を記述できる場所がプロフィール欄に表示されます。
追加したSNS情報を、表示させたいページにコピペしましょう。
[php]
Skype <?php the_author_meta(‘skype’); ?>
Twitter <?php the_author_meta(‘twitter’); ?>
Facebook <?php the_author_meta(‘facebook’); ?>
Google+ <?php the_author_meta(‘google_plus’); ?>
[/php]
このままだと、記述が無くても表示されますので
記入があるときのみ表示して記入が無いときは非表示にしましょう。
[php]
<?php if(get_the_author_meta(‘skype’) != ""): ?>
<?php the_author_meta(‘skype’); ?>
<?php endif; ?>
<?php if(get_the_author_meta(‘twitter’) != ""): ?>
<a href="https://twitter.com/<?php the_author_meta(‘twitter’); ?>" rel="publisher" target="_new" class="Gen-publisher-tw"><span>twitter</span></a>
<?php endif; ?>
<?php if(get_the_author_meta(‘facebook’) != ""): ?>
<a href="http://www.facebook.com/<?php the_author_meta(‘facebook’); ?>" rel="publisher" target="_new" class="Gen-publisher-fb"><span>facebook</span></a>
<?php endif; ?>
<?php if(get_the_author_meta(‘google_plus’) != ""): ?>
<a href="https://plus.google.com/<?php the_author_meta(‘google_plus’); ?>" rel="publisher" target="_new"class=" Gen-publisher-gp"><span>google+</span></a>
<?php endif; ?>
[/php]
the_author_meta まとめ
function.php へ書き足すだけ。
あとは必要な部分へコピペして表示させましょう。
簡単に出来たと思います。
参考サイト
参考にさせていただいたサイトをご紹介します。
http://www.communitycom.jp/2012/05/13/the_author_meta/